
As always: follow all service manual guidelines and procedures; use appropriate torque specs; and please, for god sake, exercise a little common sense. Fuel is very flammable, and extremely hazardous, both to your health and the environment. Never bench test a fuel pump (attempting to make it pump while it is NOT submerged in fuel can cause serious injury and even death, so don't frikkin do it!)
The example vehicle is a 2006 Kawasaki Ninja 636 with approximately 40,000 miles. Parts and procedures may vary for different makes and models. Please consult your service manual for specifics. This took me about an hour or so from start to finish. I would put the difficulty level at about a 4; its not terribly hard or labor intensive, but it does require some finesse to separate the fuel pump assembly from the housing.
You will need the following tools:
4mm Allen wrench/socket/T-handle
5mm Allen wrench/socket/T-handle
10mm wrench (two of them, or a shallow 10mm 1/4" drive socket and ratchet)
7mm wrench
Phillips (+) screwdriver
Flat blade/common (-) screwdriver
A clean, flat, sturdy work space
A couple of rags or paper towels
*A pair of latex gloves is strongly recommended, fuel is very bad for your health and prolonged contact with bare skin is not recommended.
*This procedure is much easier to perform with a minimal amount of fuel in the tank, ideally less than 1/4 tank, the less the better.
The first step is to remove the fuel tank from the bike. Remove the seat to gain access to the rear tank mount bolt; loosen it, but don't remove it yet. Remove the 5mm Allen head bolt at the front of the fuel tank, and the two on the side that go through the frame. Raise and support the fuel tank. Unplug the 3wire connector for the fuel pump from the wiring harness, and disconnect the fuel hose at the quick-release connector either at the fuel pump or the other end of the hose at the throttle bodies. Once that is all done, finish undoing the rear tank mount bolt, and lift the tank away from the bike.
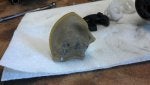
Next, place a towel or some other soft material down on your work bench to protect the paint, and place the tank upside down on the towel. There are 5 bolts with 10mm heads that secure the pump into the bottom of the tank. They are fastened with red locktite, so they take a bit of torque to break free. Remove those, and carefully slide the fuel sending unit from the tank. This is what that will look like once you get it out:
![]()
**From here on in, be very careful. The fuel tank sending unit is sold as a complete unit, individual parts are typically not sold separately so be careful not to damage anything**
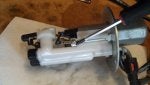
Now its time to disassemble enough of the sending unit to expose the fuel strainer. You'll need to remove the two 7mm nuts (along with 2 washers) that secure the wires to the inside (wet side) of the housing, and place all 4 pieces in a very safe place (magnetic tray, spray paint/chemical lid, stuck to a piece of masking tape, somewhere they won't run away!). You'll also need to remove the two Phillips Head screws that secure the large white plastic baffle to the sending unit housing, place those in a very special and secure location as well. These are the two screws that need to come out:
![]()
Now its time for the tricky part. That large white plastic piece needs to come off of the metal base, it slides up off of the long metal arms that you just removed the two Phillips Head screws from. I was able to use a Flat Head screwdriver to gently pry it apart, but be careful, you're fighting a rubber O-ring, and if either piece gets torn or damaged it will need to be replaced.
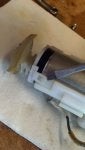
Once you get the base and the pump/baffle separated, you'll be able to see the strainer screen and oggle all the junk thats stuck in it. You can probably just blow all the crap off from there, but if its REALLY plugged up and replacing it is not an option (weather by budget or parts unavailability) then you'll need to clean it from the inside to blow all the debris out of the screen. To do that, you'll have to locate the white cap that holds the pump in place and separate it from the rest of the baffle. You'll need to (VERY CAREFULLY) spread the wings on the cap and slide it off the end:
![]()
Once that cap comes off, it will allow access to a rubber damper, the screen, and (if needed) the fuel pump itself can be removed at that point, if able to be sourced independently from the sending unit as a whole.
![]()
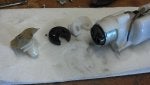
Here, you can see all the stuff that was stuck in the screen on my 06. The bike has just under 40k on the Odometer, and a majority of the debris was metal shavings, I assume they are left over from the manufacturing process as I have made a point of not sprinkling handfuls of aluminum shavings into my fuel tank with every fill up.
![]()
The example vehicle is a 2006 Kawasaki Ninja 636 with approximately 40,000 miles. Parts and procedures may vary for different makes and models. Please consult your service manual for specifics. This took me about an hour or so from start to finish. I would put the difficulty level at about a 4; its not terribly hard or labor intensive, but it does require some finesse to separate the fuel pump assembly from the housing.
You will need the following tools:
4mm Allen wrench/socket/T-handle
5mm Allen wrench/socket/T-handle
10mm wrench (two of them, or a shallow 10mm 1/4" drive socket and ratchet)
7mm wrench
Phillips (+) screwdriver
Flat blade/common (-) screwdriver
A clean, flat, sturdy work space
A couple of rags or paper towels
*A pair of latex gloves is strongly recommended, fuel is very bad for your health and prolonged contact with bare skin is not recommended.
*This procedure is much easier to perform with a minimal amount of fuel in the tank, ideally less than 1/4 tank, the less the better.
The first step is to remove the fuel tank from the bike. Remove the seat to gain access to the rear tank mount bolt; loosen it, but don't remove it yet. Remove the 5mm Allen head bolt at the front of the fuel tank, and the two on the side that go through the frame. Raise and support the fuel tank. Unplug the 3wire connector for the fuel pump from the wiring harness, and disconnect the fuel hose at the quick-release connector either at the fuel pump or the other end of the hose at the throttle bodies. Once that is all done, finish undoing the rear tank mount bolt, and lift the tank away from the bike.
Next, place a towel or some other soft material down on your work bench to protect the paint, and place the tank upside down on the towel. There are 5 bolts with 10mm heads that secure the pump into the bottom of the tank. They are fastened with red locktite, so they take a bit of torque to break free. Remove those, and carefully slide the fuel sending unit from the tank. This is what that will look like once you get it out:

**From here on in, be very careful. The fuel tank sending unit is sold as a complete unit, individual parts are typically not sold separately so be careful not to damage anything**
Now its time to disassemble enough of the sending unit to expose the fuel strainer. You'll need to remove the two 7mm nuts (along with 2 washers) that secure the wires to the inside (wet side) of the housing, and place all 4 pieces in a very safe place (magnetic tray, spray paint/chemical lid, stuck to a piece of masking tape, somewhere they won't run away!). You'll also need to remove the two Phillips Head screws that secure the large white plastic baffle to the sending unit housing, place those in a very special and secure location as well. These are the two screws that need to come out:
Now its time for the tricky part. That large white plastic piece needs to come off of the metal base, it slides up off of the long metal arms that you just removed the two Phillips Head screws from. I was able to use a Flat Head screwdriver to gently pry it apart, but be careful, you're fighting a rubber O-ring, and if either piece gets torn or damaged it will need to be replaced.
Once you get the base and the pump/baffle separated, you'll be able to see the strainer screen and oggle all the junk thats stuck in it. You can probably just blow all the crap off from there, but if its REALLY plugged up and replacing it is not an option (weather by budget or parts unavailability) then you'll need to clean it from the inside to blow all the debris out of the screen. To do that, you'll have to locate the white cap that holds the pump in place and separate it from the rest of the baffle. You'll need to (VERY CAREFULLY) spread the wings on the cap and slide it off the end:
Once that cap comes off, it will allow access to a rubber damper, the screen, and (if needed) the fuel pump itself can be removed at that point, if able to be sourced independently from the sending unit as a whole.
Here, you can see all the stuff that was stuck in the screen on my 06. The bike has just under 40k on the Odometer, and a majority of the debris was metal shavings, I assume they are left over from the manufacturing process as I have made a point of not sprinkling handfuls of aluminum shavings into my fuel tank with every fill up.